A useful screensaver is usually not the busiest composition. It should remain readable from a distance and comfortable over time. Choose the background and target display first, add only the information you need, then introduce motion and sound.
Build a readable first scene with one photo and a clock
Prepare
Choose a landscape photo you have the right to use. Start a new project and name it so you do not overwrite existing work.
Steps
- In the canvas settings, select 16:9 and add the photo as background media. Start with Fit to see the entire source, then compare Fill to see what gets cropped.
- Add a clock and move it into a quiet part of the photo. Choose a contrasting color and leave lengthy captions out of this first version.
- For a stationary layout, set movement, display and transform behaviors to their still settings. If you add a small image decoration, change W and H under Size and position to check its actual size.
- View the preview and fullscreen from your normal seating distance. Reopen the project from My screensavers to check saving, then use Save backup in Storage to keep an .ambientpack file.
Check the result
The clock should not cover the main subject, should be readable in fullscreen, and should keep its placement when you reopen the project.
If the result differs
If the clock is hard to read, move it to a darker, less busy area rather than only enlarging it. An image or text excluded from static merging may still have display or transform animation. Live clocks cannot be merged into a static image.
Example 1 · Place a clock in the quiet part of a café photo
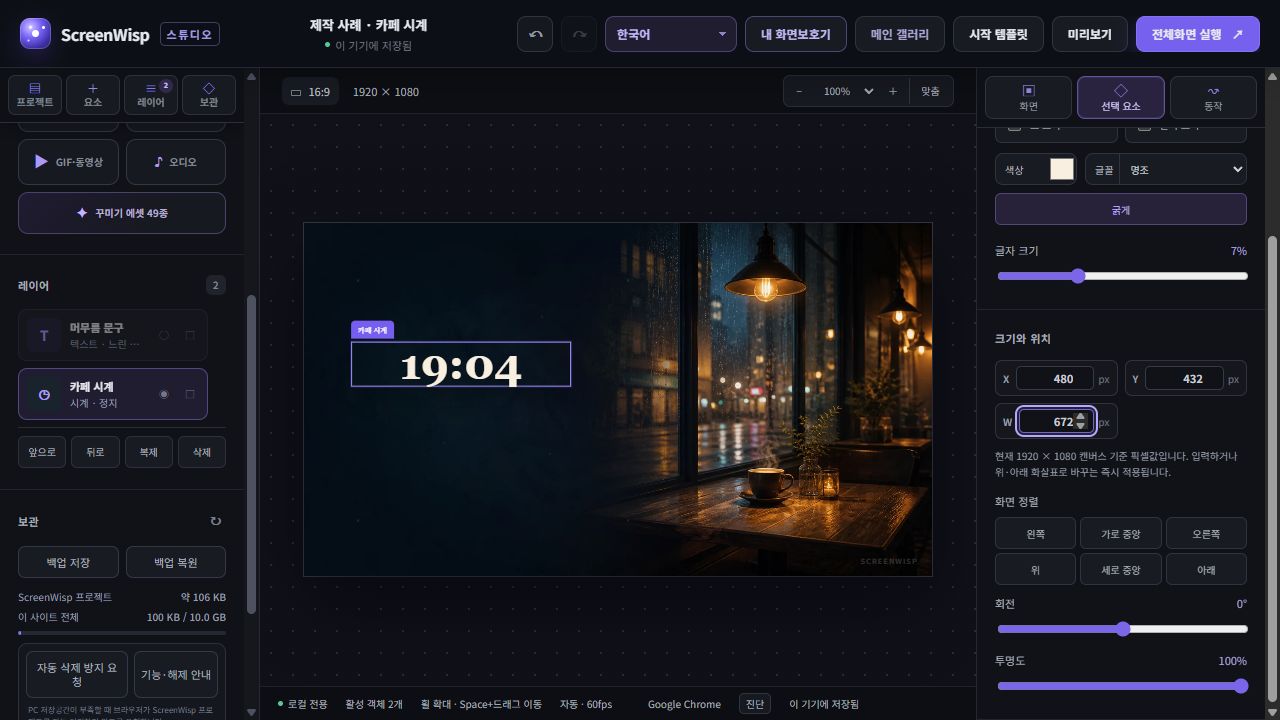
Keep the bright lamps and cup on the right unobstructed by placing the clock in the dark space on the left. Import the picture as a background so its fit is independent of the clock.
Authentic Korean Studio screenshots captured in desktop Chrome on 2026-09-19. The captured clock time is not fixed; it updates live. Use the translated instructions alongside the Korean UI in the images.
Reproduction settings
- Canvas
- 16:9 · 1920 × 1080
- Clock center and width
- X 480 / Y 432 / W 672 px
- Background scale and position
- 100% · X 50% / Y 50%
Steps
- Open the café template and use it as a new project. Name it and set the canvas to 16:9. Templates can choose a different background for your display ratio; save the linked source image and use Replace in Background to reproduce this exact example.
- Hide the caption with its eye button in Layers; do not delete it. Select the café clock and enter X 480, Y 432, W 672. X and Y describe the element center, not its top-left corner.
- Use a digital 24-hour clock, serif font, 7% font size and #f8efe0. Turn seconds and date off; keep rotation at 0° and opacity at 100%. Set the background to Fill, scale 100%, horizontal and vertical position 50%.
Check the result
Check that the time is legible on the left without covering the lamp or cup. W controls the clock box width, not the font size. This is a still photo with a live clock, without rain audio. Preview the result and save an .ambientpack backup when finished.
1. Decide on the display and media
Check the resolution and aspect ratio of the monitor you will actually use. Most PC displays are 16:9 or 16:10, while ultrawide monitors commonly use 21:9. Source artwork at or above the intended display size reduces visible softness when it is enlarged.
- Confirm that you have permission to use each image or illustration.
- Prefer short clips with clean loop points for GIF and video.
- Listen to audio over several loops before adding it to a long-running scene.
2. Set the background and canvas ratio first
Choose a solid color, gradient, or background media, then match the canvas to the target monitor. Cover fills the frame but can crop edges. Contain preserves the complete image but can leave space. A blurred fill keeps the full original in front while using a soft enlargement to fill the remaining area.
3. Place information and decoration
- Keep a clock away from screen edges and give it sufficient contrast.
- Limit copy to one or two short lines at a size that works across the room.
- Resize images, GIFs, and video with edge handles or enter X, Y, W, and H values directly.
- Reorder overlapping layers and lock finished elements to prevent accidental movement.
4. Add motion only when it serves the scene
Choose a slow float, straight movement, or curved path that matches the atmosphere. Off-canvas path points let an object enter gradually from outside the visible area and leave again.
Multiple GIFs, videos, and particle effects can raise CPU and GPU load quickly. If heat or dropped frames appear, reduce simultaneous media, resolution, or frame rate before adding more effects.
5. Save and test in real fullscreen
- Confirm that the project is saved in My screensavers.
- Run it for at least ten minutes and check motion, audio loops, wake behavior, and heat.
- Export an important project as an .ambientpack and keep it separately.
- On supported Edge and Chrome versions, a folder you select can become the project store.
Try the workflow instead of only reading about it
ScreenWisp lets you create and preview a fullscreen display inside the browser without an account or a media upload.
Create in Studio ↗